

Before I had this blog, I had an Etsy store, and associated with it was a little craft blog. I haven’t kept up on that craft blog but I wanted to move some of my favorite posts over here. Healthy living easily extends to the activities we do with our children and what they play with. This Waldorf doll is a perfect gift to make and give someone you love. You can make a Waldorf doll in an afternoon, and it will provide years of love.
The body and hat are made of soft cotton velour and the head and body is stuffed with 100% sheep’s wool, which smells so sweet and retains warmth when your child holds it. The hair is natural mohair.
The body and hat are floppy to enable the youngest baby to be able to pick it up. I designed this doll for my daughter when she was 2 months old.
A 2-month-old baby will be delighted to see the simple facial features. Once the baby is a little older, the doll is lightweight and easy for them to grasp, making it one of the first toys that they are able to grab on their own. When teething starts, the soft velour tip of the hat is just the right texture for little mouths to gnaw on. This doll then becomes a favorite lovey that can be toted around once the child is older. We especially like it as a ‘nursing lovey’ because it can be held and touched by a nursing babe or child without being too bulky.
♥ Care: We wash and dry our dolls in the washer and dryer. This will cause the head to compact a bit as the wool compacts, but the dolls are still fine. We put ours in a pillow case, tie it shut, and then toss in the wash with our clothing.
I learned to sew Waldorf dolls while working in a Waldorf preschool, where I worked during the summers while going to school.
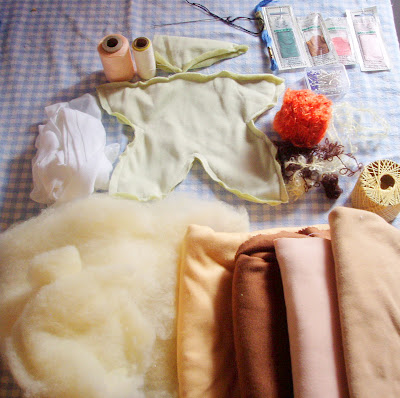
Supplies to make a Waldorf doll for infants
- Wool batting (you want the puffy kind)
- Pins
- 5-inch doll making needle
- Cotton string to make the eye indents and shape the head
- Embroidery floss in eye and lip color
- Velour or flannel for the body and cap.
- Matching thread for the skin color and body color.
- Gauze stockingette to form the head (we use medical gauze, you need about 12″ for the doll)
- Skin-colored interlock fabric for the face

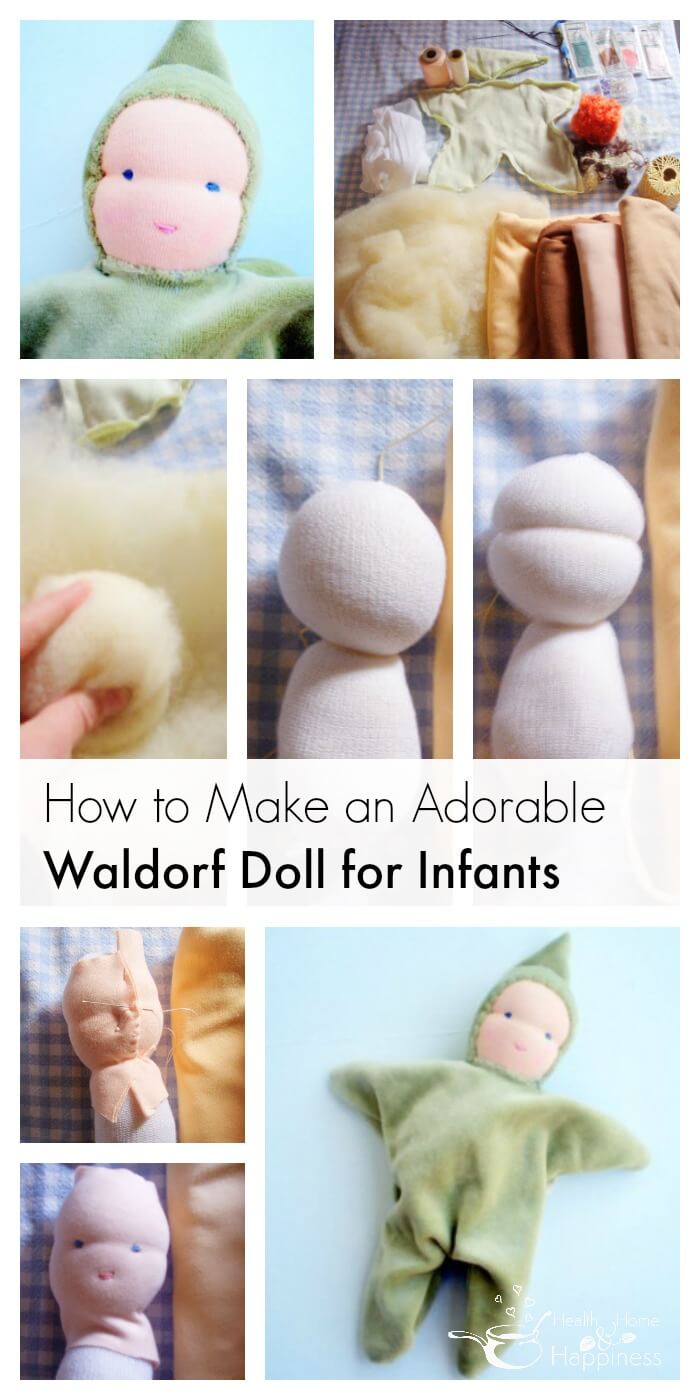
Shaped head for a waldorf-style doll
Your wool batting comes in sheets and has a definite grain to it. Open up the sheet and pull off a strip.
Separate this into two pieces, a narrow piece that will be rolled tightly into a firm ball, and another piece,which will be torn in half making 2 shorter pieces.

Roll your long piece into a ball, using pressure and making it as firm as you can. This will give the doll head structure.
The finished ball, the inside of the head.
Using one of the smaller pieces of batting that you pulled off, cover the ball with them and bring it around to gather at the bottom, kind of like you would put on a mitten. This will become the neck and keep the doll’s head from flopping backwards.

Repeat with the other piece of batting. This isn’t done as firmly as the ball for the inner part of the head.

Using about 18 inches of stockingette (I think I used 1-1/4 inch for these dolls), twist in the middle of it and then slip one end over the other, so it creates a closing at the end. This can also be done by knotting the end, but that makes a lump on the top of the doll’s head so I prefer to do it this way.


Insert the head you made out of wool and bring the stockingette down to the bottom and tie off or sew off so that the wool is all encased in the stockingette (not shown).

Using the string (I have to double it up so it doesn’t break) first tie off where your neck will be, right below the ‘firm ball’ that was made with the batting. You want to do this firmly and may need help tying the knot. I do it by making the knot and holding the whole thing against the table as I make the second knot to ‘lock’ it in.

Repeat half way up for the eye line. I put that in bold because it is important to do it half way up and not any further to make the doll look accurate.
To make your Waldorf doll face
Cut a piece of skin fabric that can go around the head completely,with overlap. Magic Cabin’s patterns will tell you to sew a head shape out of skin fabric, but I prefer to do it this way, I think it looks better. Notice the stretch of the fabric is more in one direction than another- you want the stretch to be going across, not lengthwise. This will allow it to constrict where the eyes and neck are, showing detail.

Sew it up. This isn’t going to show, the cap will be covering it.

Using your floss and 5-inch doll making needle, and starting from the back of the head to anchor, stitch in the mouth and eyes. I like to do 2 lines for the mouth and 3 or 4 each for the eyes, but you can play around and see what you like. Tie the strings together in the back of the head to anchor.
My finished doll face.

Don’t stuff the body, simply insert the bottom part of the gauze-wrapped stuffing into the body.

To sew your doll all together
Sew the body and cap out of velour or flannel or even cotton jersey (t-shirt material) is nice. I prefer to use natural fibers because babies chew on these, and natural fibers are just nicer.
{I lost the pictures for these- and I don’t have my doll making stuff any more, if I make another I’ll update with more pictures- the head is the hardest to make anyway, and I do have those pictures :) }
To make the body, you can just copy the general pattern that mine is, it isn’t anything really specific. When in doubt, make your hat a little big. If the fabric has stretch, make the hat stretchy around the face and around the neck.
Trim the excess away and turn right side out.
Position the head inside of the cap and body. I don’t stuff these, as the ‘floppiness’ makes them easier for little babies to grab and hold onto, and makes them thinner to be used as ‘nursing loveys’
To get the cap to stay where I want it, I generally tack the bottom corners with pins before I start sewing.
Sew around the whole thing, use a blanket stitch or a running stitch, or a whip stitch, whatever seems to work for you. I go around the neck twice for durability.
When attaching the cap, catch not only the skin fabric but also go into the wool a bit to add strength and anchor the whole thing together. I attach the corners of the hat at the chin with a pin and then sew.
Raw edges go to the inside.
Stitch the bottom of the cap (folded under) to the neck of the bodysuit.
And the finished doll!
If you want to make these to sell, you are totally welcome to. I learned this from a wonderful Waldorf preschool teacher who was so generous with her knowledge that I would like to pass on the favor. Please, though, do not sell my directions. However, please feel free to link to them!
Please also note that I have made likely close to 200 of these dolls. It doesn’t come together easily at first, but it gets much easier with practice. Feel free to ask me questions if you have any!
Learn how to heal leaky gut

60-page ebook of all my best GAPS Diet (Gut and Psychology Syndrome) articles all in one place.
this dolly pattern is darling. thank you for posting the directions and pictures.
Hi! This one is wonderful.
I wish to make one for my daughter. Where is the pattern for the body and the suit of the doll? Thank you
Thank you so very much for this tutorial & directions! I have a brand new 5 week grand daughter & we want to encourage Waldorf toys!! My daughter is so excited for this doll! ❤️
Thank you very much for your tutorial. I have to make some dolls for my home based daycare and am thinking of following your instructions for my 2 to 5 y-o- kids who love “baby dolls” better than “big kid dolls”. Maybe I’ll stuff the body a bit for them. My question is about washing and hot drying them, which will have to take place at least every week because of regulation.
Do you think it’s going to deteriorate them too much? Should I should use synthetic stuffing even if it’s less nice? How about steaming them for 10 minutes, would this damage them less?
Thanks if you can make the time for this
Marie
Howdy! I want to make one for my daughter’s first birthday with fleece from our sheep and up-cycle a wool sweater I thrifted for the clothing. Am I missing the information with the pattern for the body suit? Thanks for the tutorial though! The head seems much less intimidating now :)
Is there pattern for the body suit available?
Many thanks 🙏
Can’t wait to get started but the link to the gauze isn’t working and I am not sure what size to get. Any advice? Thanks!
How can i get the pattern? The link for the pattern is not working.
Really nice tutorial,thanks !
How can I get the pattern ?