• Menu
  • Skip to primary navigation
  • Skip to main content
  • Skip to primary sidebar

Before Header

  • The GAPS Diet: Everything You Need to Know
  • Blog
  • Contact

Health, Home, & Happiness

Your resource for a healthy happy home

Mobile Menu

  • THE GAPS DIET
    • I want to do the GAPS Diet, where do I start?
    • What Is The GAPS Diet?
    • GAPS Intro Diet Ebook
    • GAPS Intro Stages
    • Moving To The Next GAPS Stage
    • GAPS Family
    • GAPS & Breastfeeding
    • GAPS Cheats
    • GAPS Troubleshooting
    • Ketogenic GAPS
  • THE KETO DIET
    • How to Start the Ketogenic Diet & What You Can Eat on Keto
    • Keto Diet for Kids: Risks and Benefits (huge benefits!)
    • The Ketogenic Version of the GAPS Diet
    • Boost Your Keto: 3 Quick Changes to Get More Out of a Low Carb Diet
    • Why You Need Fat Bombs (low carb, keto, GAPS)
  • Recipes
    • breakfast
    • Main Dish
    • Dessert and Treats
    • keto recipes
    • Dairy-Free
    • Carnivore Diet/Zero Carb Diet
  • About
    • About Cara
    • Leaky Gut Treatment Through Diet
    • Healing Brain Trauma with Food, Supplements, and Lifestyle (Autism, TBI, PTSD)
    • Gourmet Candymaking Without Corn Syrup, Canned Milk, Artificial Colors or Flavors
    • The Soup Challenge
    • Folate vs Folic Acid, Tongue Ties, and Why I Regret Taking My Prenatal Vitamin
  • BeautyCounter
    • Shop Safer Skincare and Makeup
  • Classes & Ebooks
    • What Can I Eat Now? 30 Days on the GAPS Intro Diet
    • Gut-Healing Starter Pack
    • Picky Eating Solution Webinar
    • Keto Family Class
    • Freezer Cooking Class
    • Candy Making Without Corn Syrup
    • Member Login
    • Carnivore Training Wheels Class Login

Homemade Playsilks Made With Food Dye

Home » Do it yourself and save » Homemade Playsilks Made With Food Dye

Making play silks at home is a fun easy project- it’s easy to make beautiful colors of silk to give as gifts and let your children’s imaginations run wild.   The silks are ordered online, and then the dye is just Wilton’s cake dye. Our family doesn’t use food coloring in food, but it’s a relatively nontoxic dye for decorations and play things.

What do we use dyed silk for?

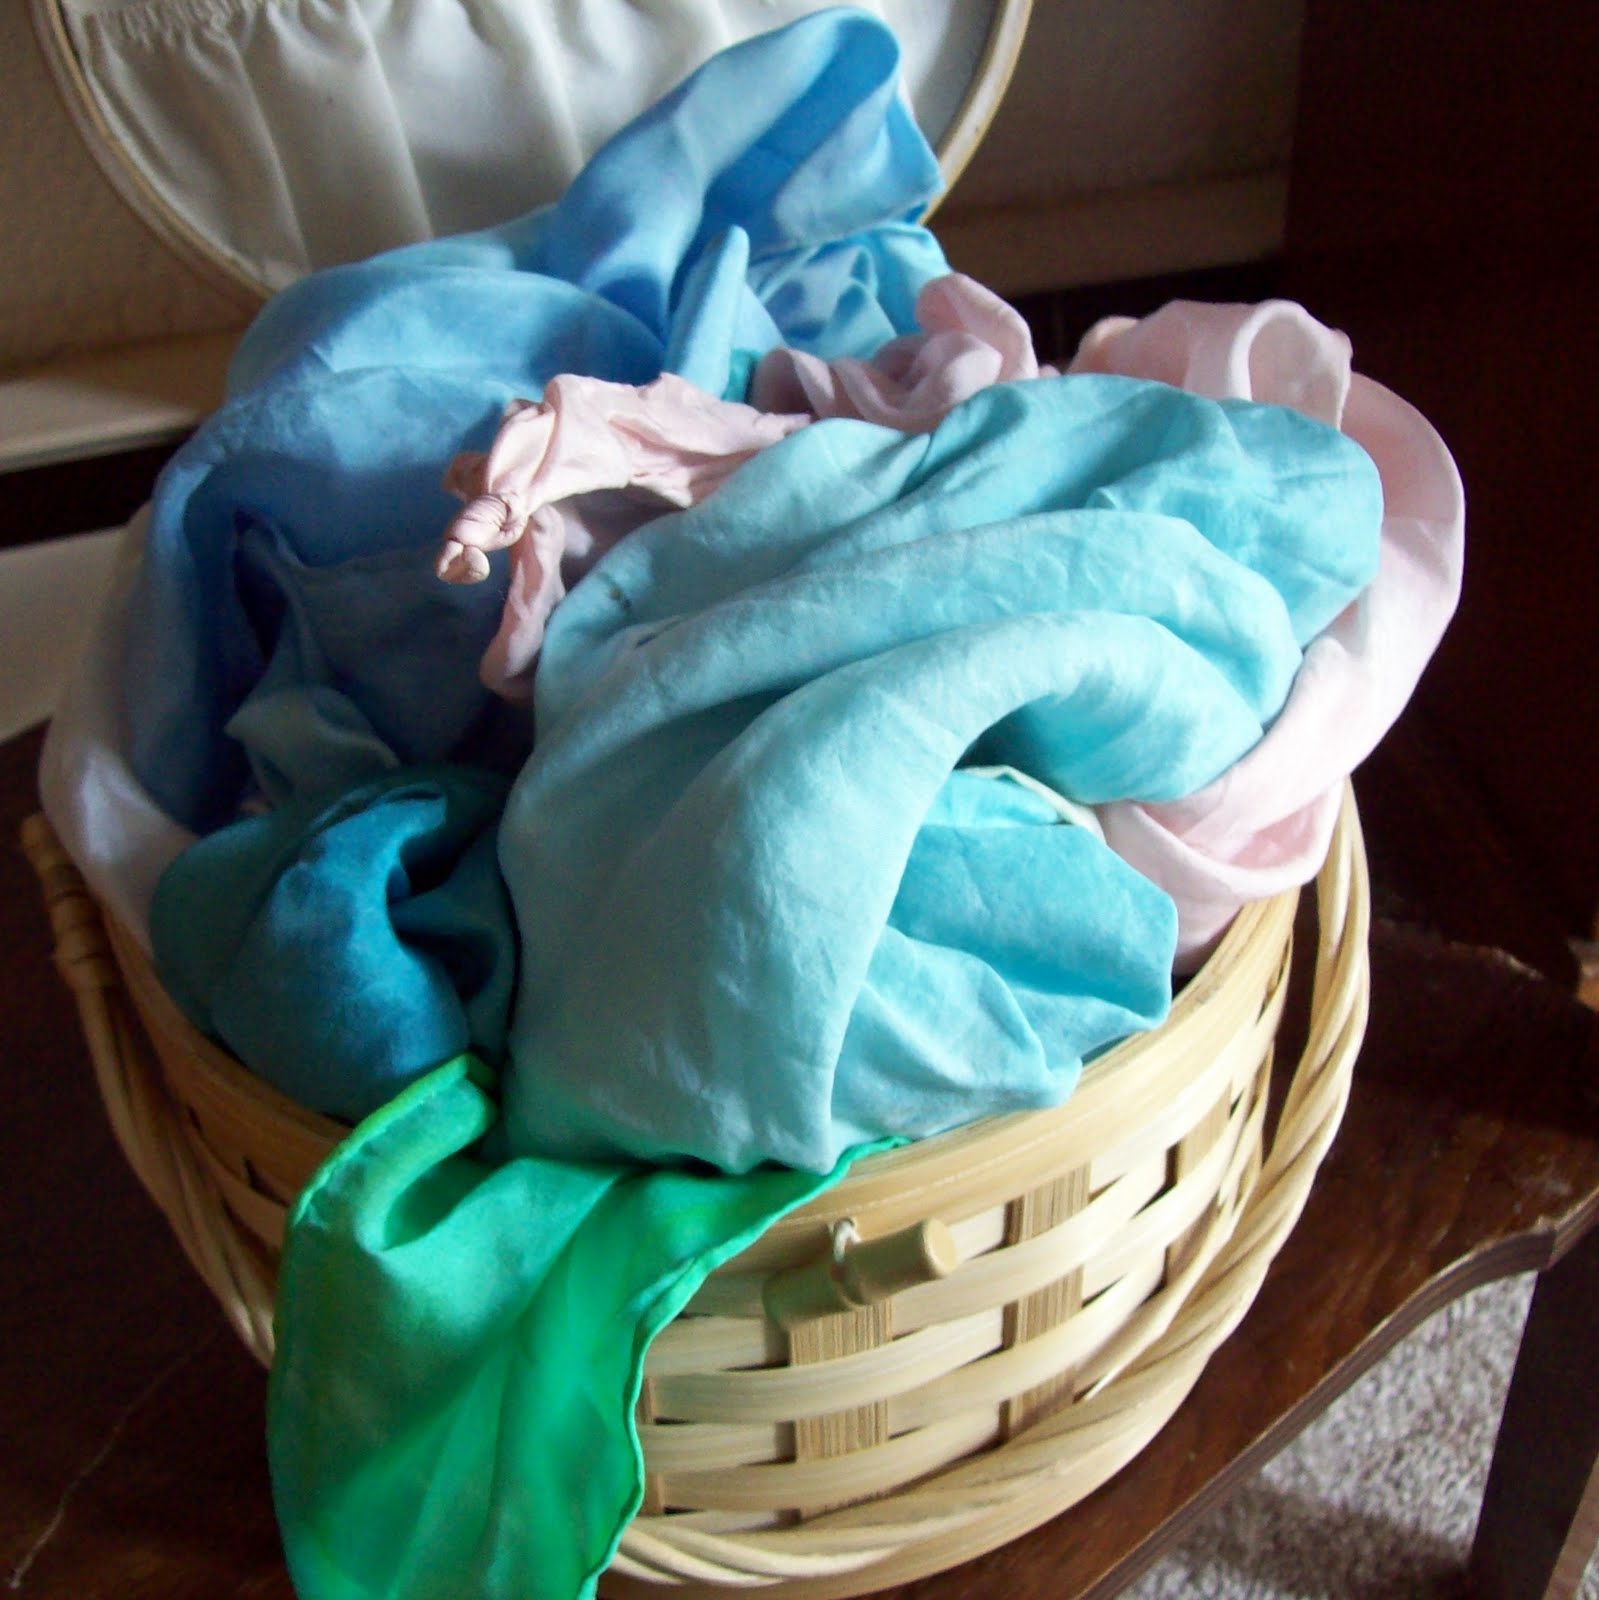
I started doing these primarily for the kids.  Play silks, called silkies too, are perfect for imaginative play.  Any child who loves emptying the hall closet of blankets to build forts would know just what to do with big silk squares –play clips are the the perfect tool to secure to chairs, but beanbags can be used as well.  Fixing the ‘collapses’ is most of the fun in home-tent building anyway ~grin~.

For the aspiring fashion designer, they are perfect for dress up. We tie ours (loosely!) around our neck and run around, letting our capes flow behind us as we dash off to save the world.

With decorating, they add a really pretty handmade look to any place that needs a little color.  A larger one can be a tablecloth, a scarf can be a table runner, and they can be folded and placed across a shelf to add color under a collection.

I suppose they could be worn as scarves too, though I’ve never actually done that!

How To Dye The Silk- Directions:

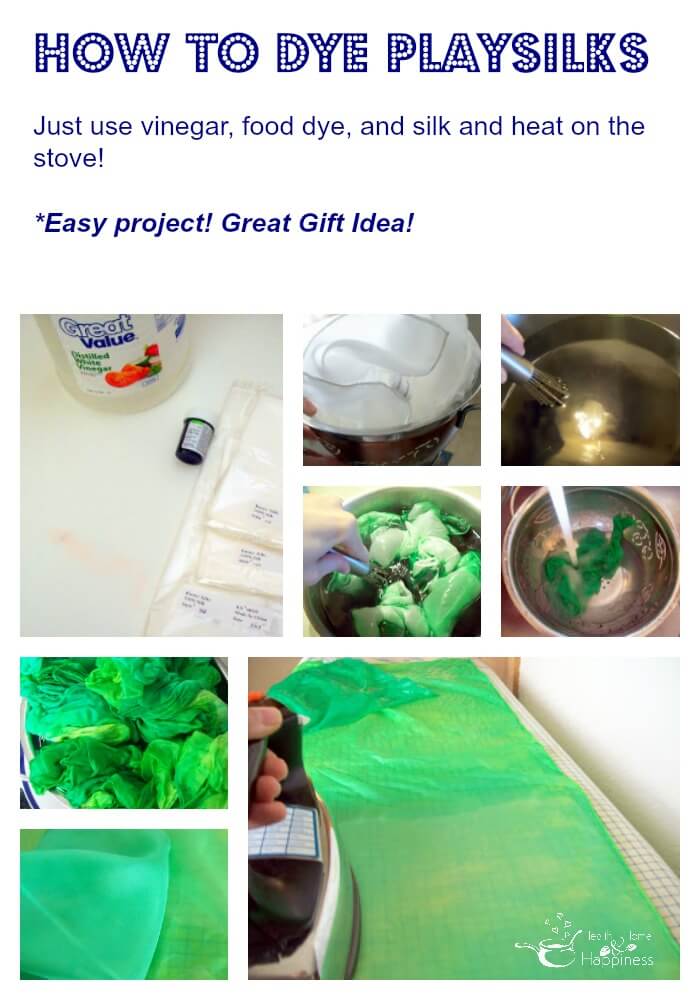
You need dye, vinegar (just to disrupt the pH so that the dye uptakes), and silk scarves.

One tub of Wilton’s Cake Dye does quite a bit.  I did twelve 36×36″ silkies and twelve 11×11″ ones with one tub.

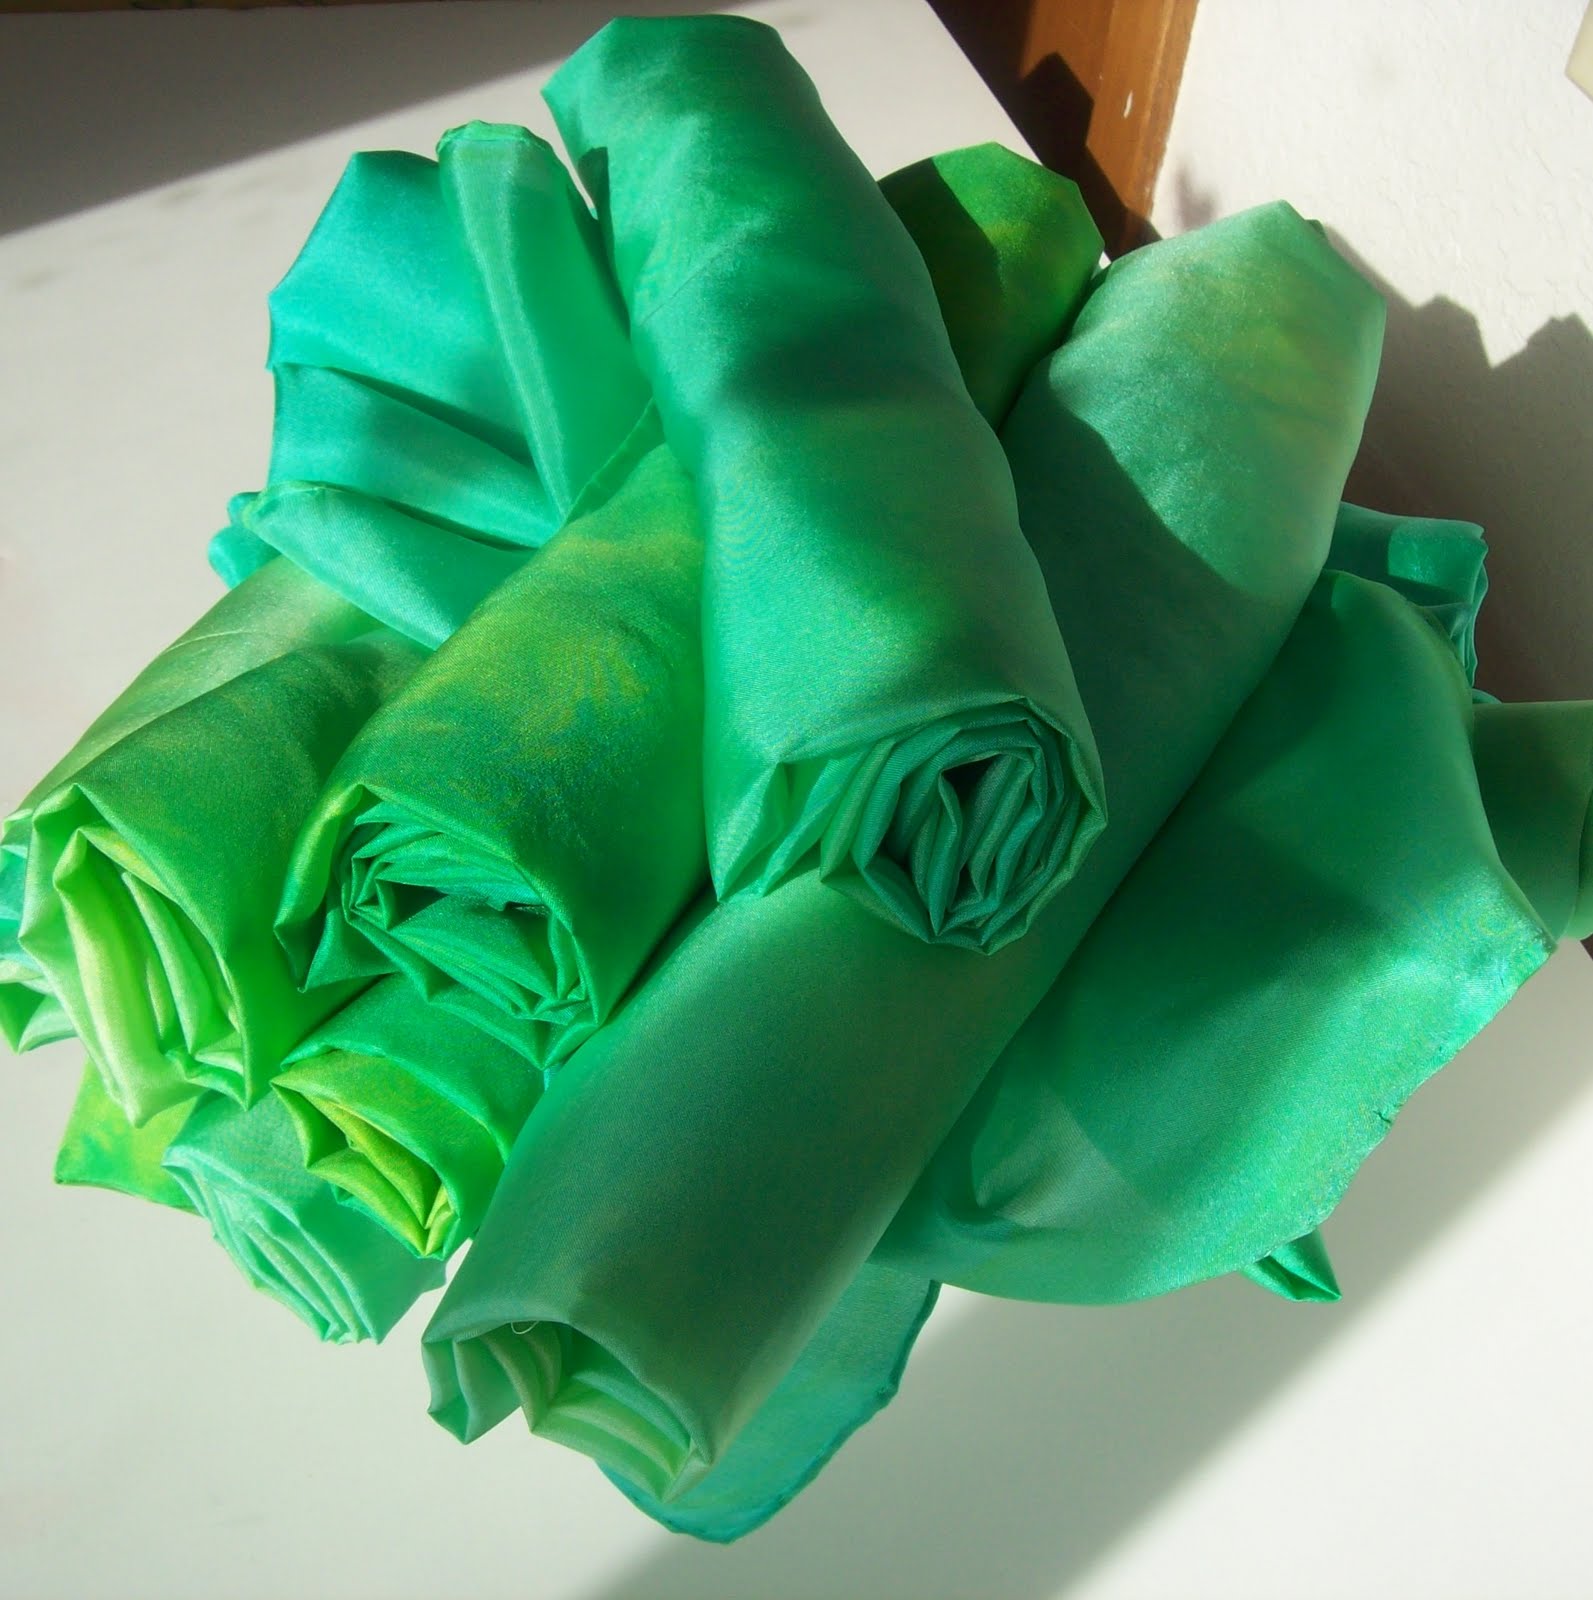
I’m using leaf green here (Walmart has these, as well as craft stores that stock cake decorating supplies).

Moss green is really pretty too- more of a sage.

The colors don’t always turn out exactly as pictured on the label, but they’re still pretty.

I’ve used Cornflower Blue before, and it separated into a deep purple and light blue during the dying.

Reds have washed out for me to a mauve or pink.

Yellow seems to be pretty predictable, as does green.

I did better getting purple from cornflower blue than I have from something that’s actually supposed to be purple.

You can use Kool Aid too- I use one package per 36″ silk, and you don’t need the vinegar if you use Kool Aid since the citric acid in it does the same thing. Just use the unsweetened packets that are 0.19 or somewhere around there at your grocery store.

It’s not an exact science but it’s good for those of us who like pretty surprises and don’t stress about exact color matches.

I buy my silks at Thai Silks– the ‘China Silk Scarves’ is what I use for these.  The 44″ x44″ ones make really pretty table cloths and forts.  That size is a little big for my toddlers- they get caught up in it and it overwhelms them.  The 36″x36″  is a really nice size for everything. 22×22 is a little more manageable for little ones, and the 11×11 are fun to play peek-a-boo with.  They come with finished edges that are sewn with silk thread, so it takes up the dye too.  Cotton or polyester won’t take up the dye.  (Wool will because it’s a ‘protein fiber’ as well).

Once you have everything, start a big pot of water boiling.  Unpackage your silkies and shake them out so they’re not folded any more. Get them wet with warm or cold water- this helps the dye to be absorbed more evenly.

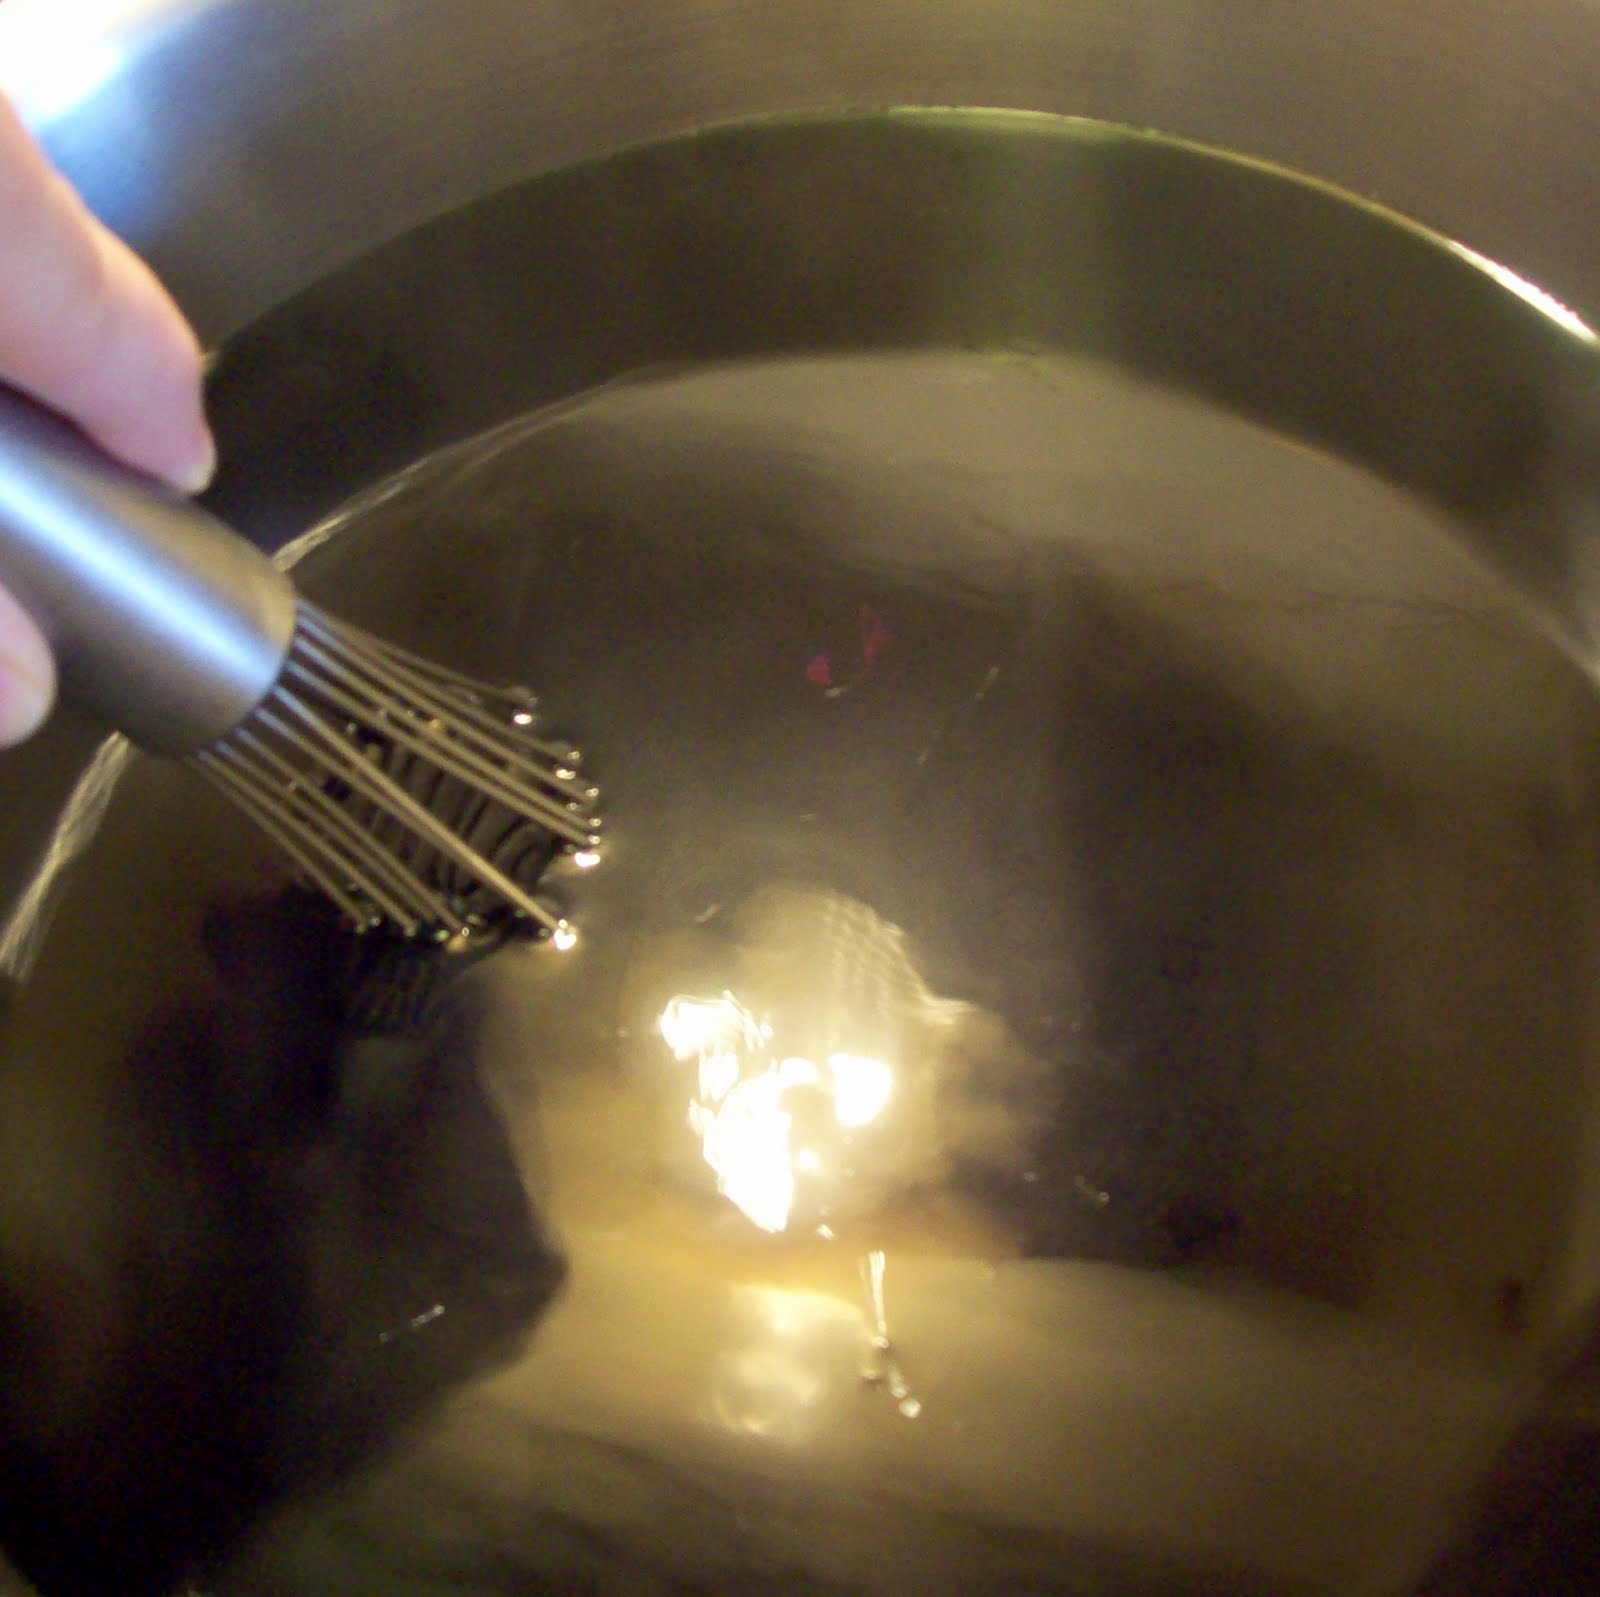
Once the water is hot, turn the burner down to medium-low, add in the dye, and mix throughly with a whisk or fork to break up clumps.  Add a couple tablespoons of vinegar.  Any clumps of dye will leave splotches on your silk, which can also be a cool effect but isn’t what I’m going for here.

I use metal utensils- If you use wood or possibly plastic, the color will not come out until you’re using it to cook with again. ;) (betcha can’t guess how I know that?)

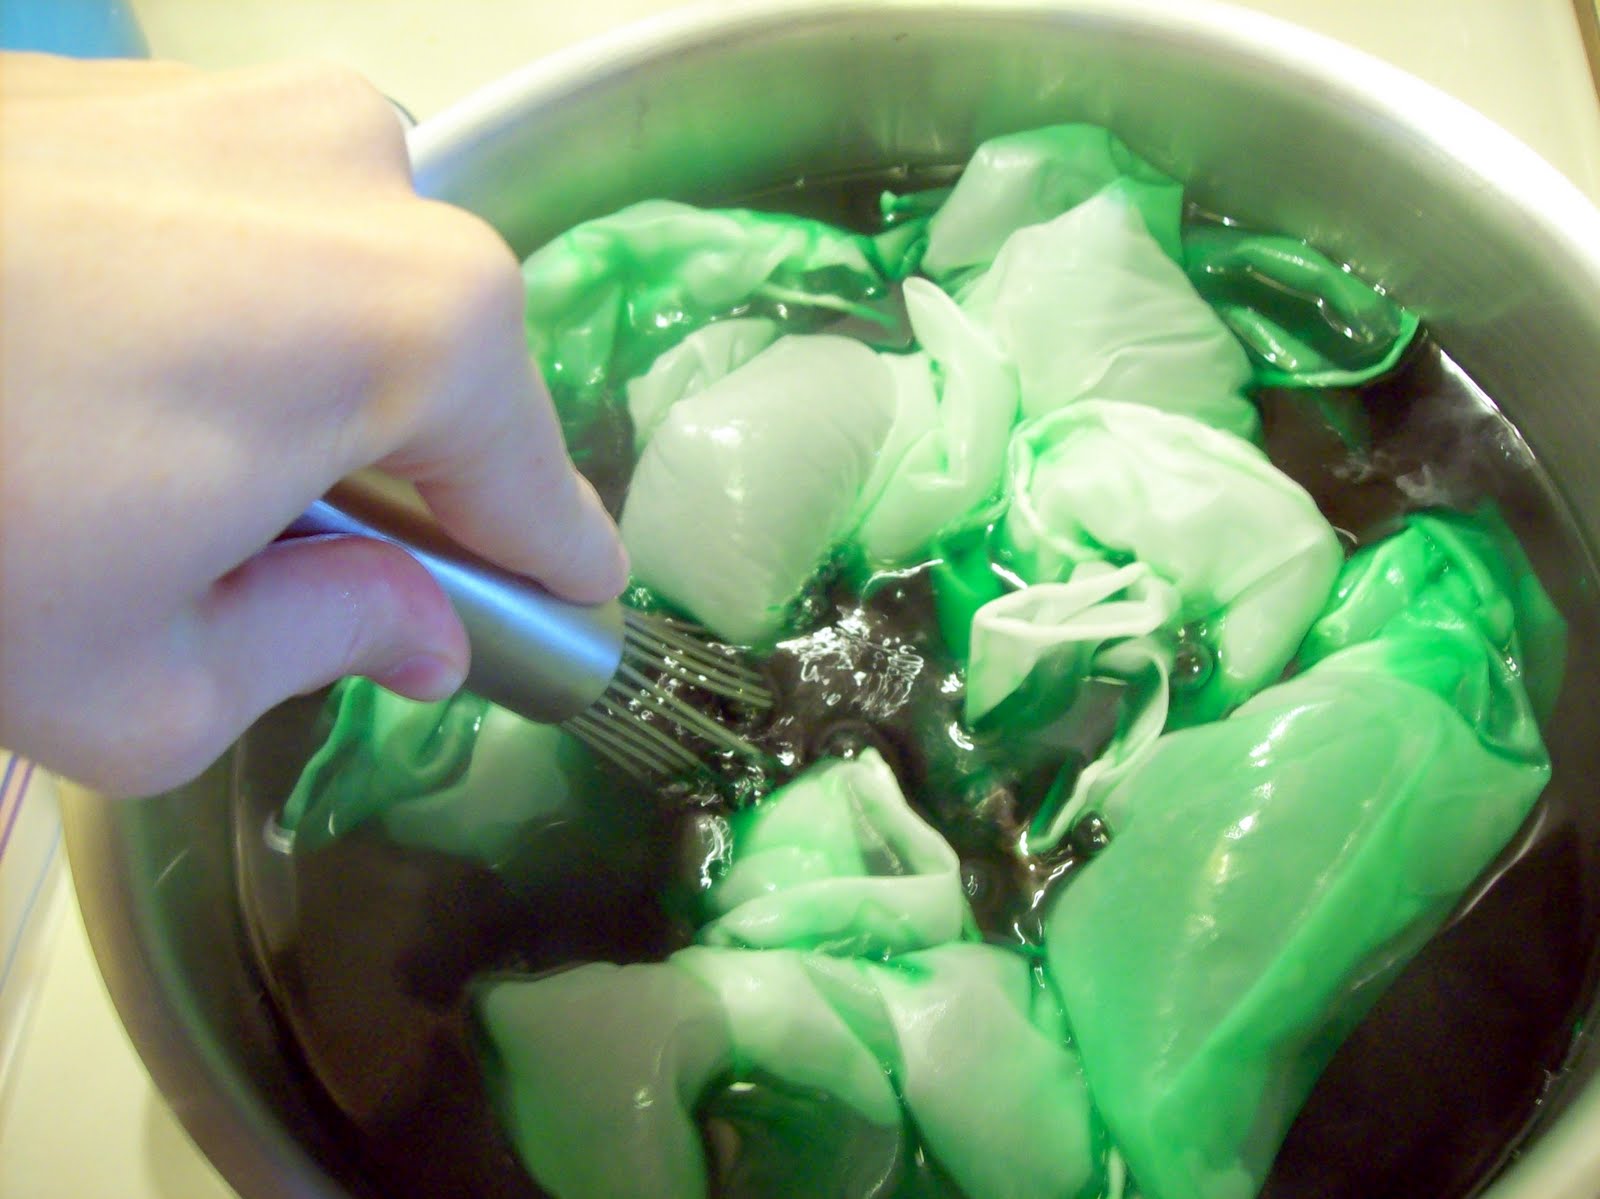
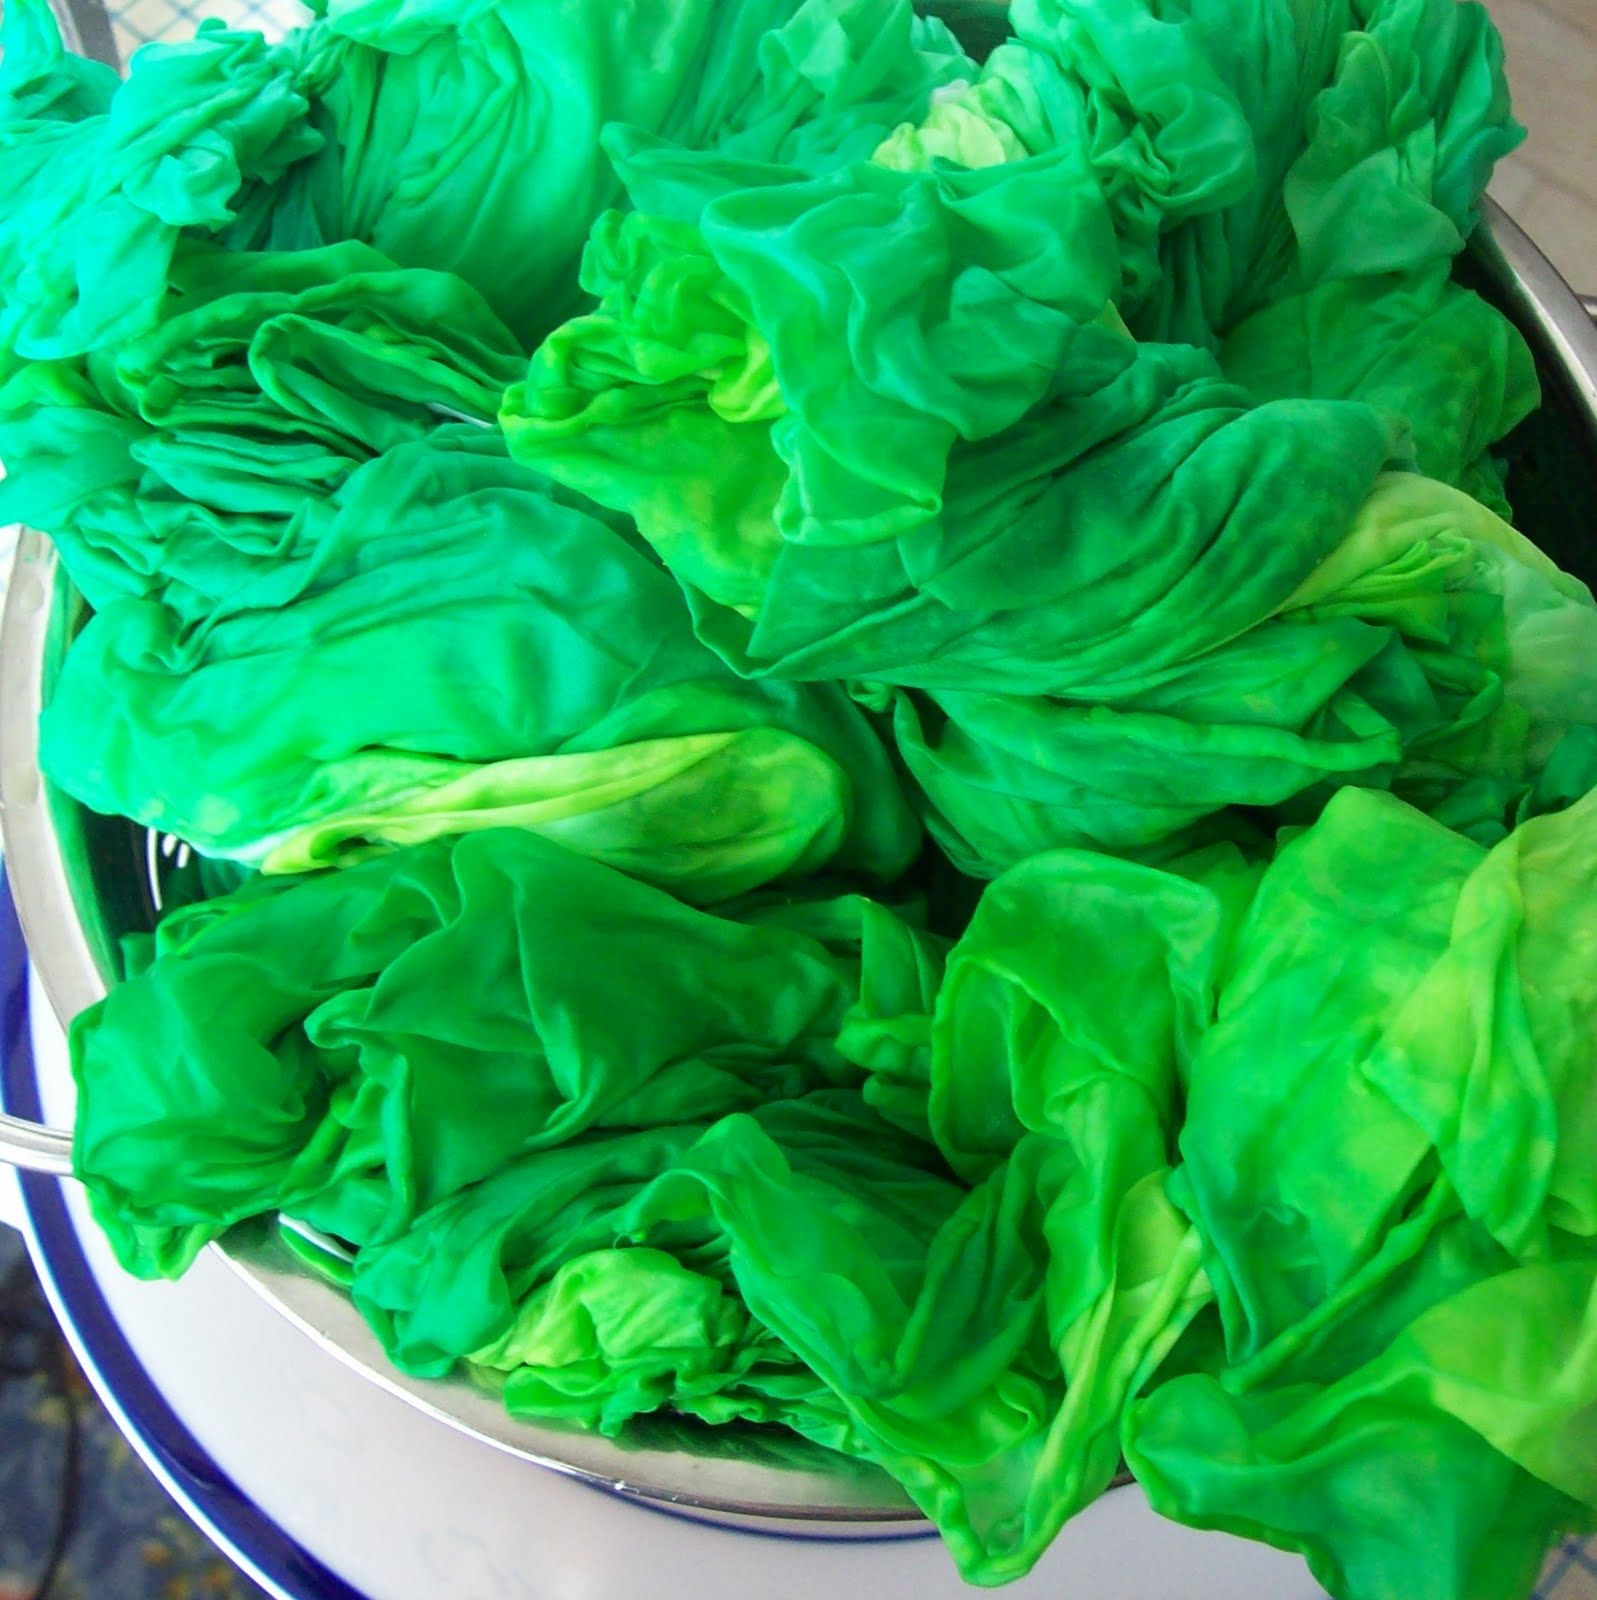
Add your silks in. For more evenly-dyed silks don’t pack the pot full.  This is pretty full, and it makes it have more color variations as different parts of different silks will take up more dye than others.

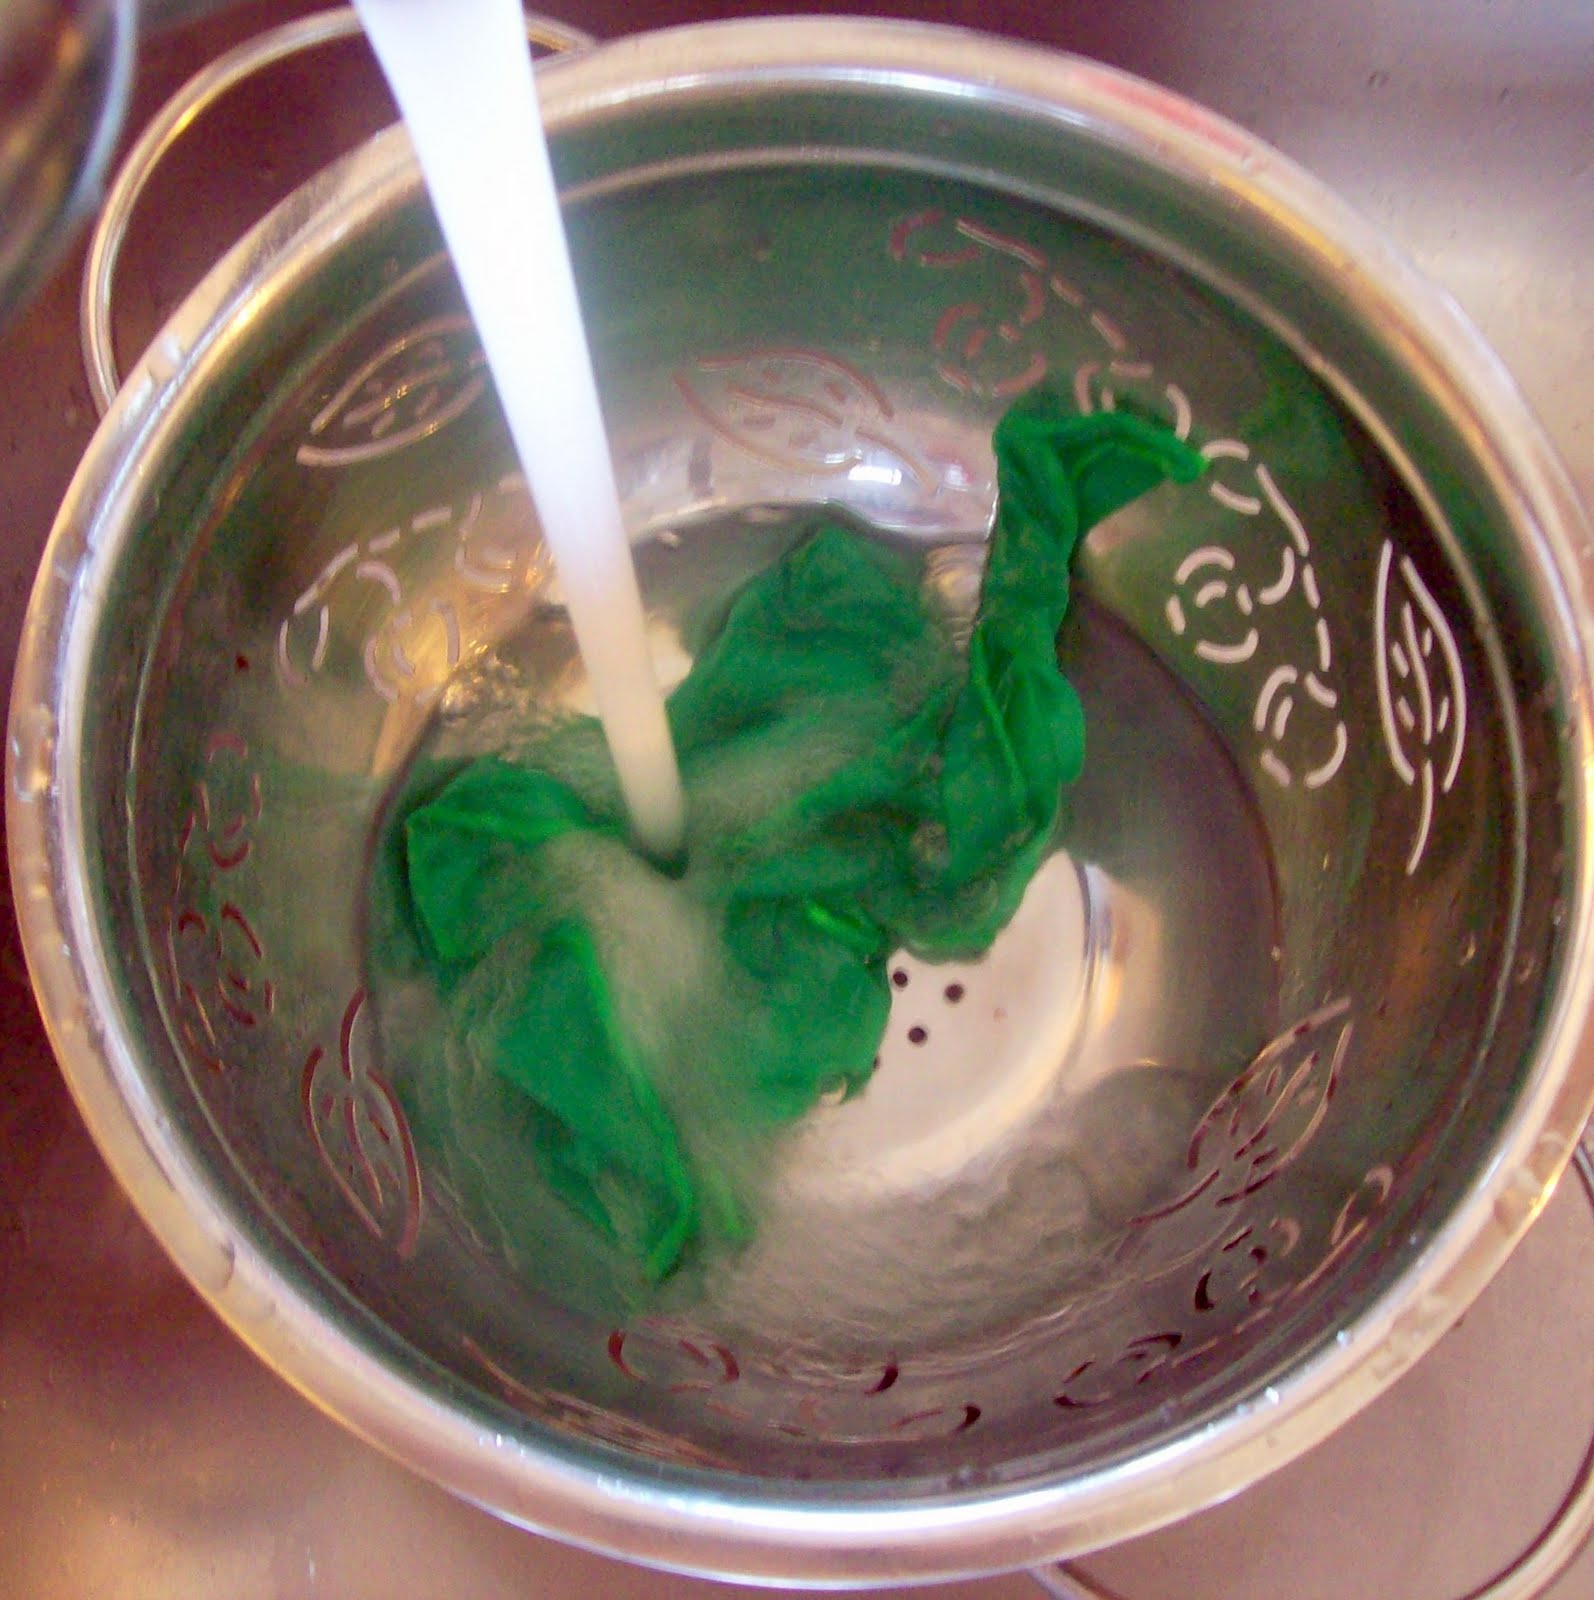
Allow to stay in the water 10-30 minutes- the longer they stay in the water, the more saturated the color will be.  I like to have a few smaller silkies in there (the 11×11 ones) so that I can test for color easily.  To see how the color looks, remove, and then rinse with cold water until the water runs clear.  I like how this looks, so I rinse them all.

You can line dry them, but they’re really soft and pretty if you iron them when they’re still damp.  I iron with a hot iron, no steam, moving quickly to avoid leaving lines as the water evaporates.  Cover your ironing board with a towel- some of the dye will come out even if you rinsed really well.

See the difference? These were in the same pot, just one was on the bottom getting more dye than another.  With something like green, the blue and yellow will uptake differently- so the silks that are absorbing more of the color first will be more bluish (since the blue is quicker to absorb) and the silks added later are more yellow.

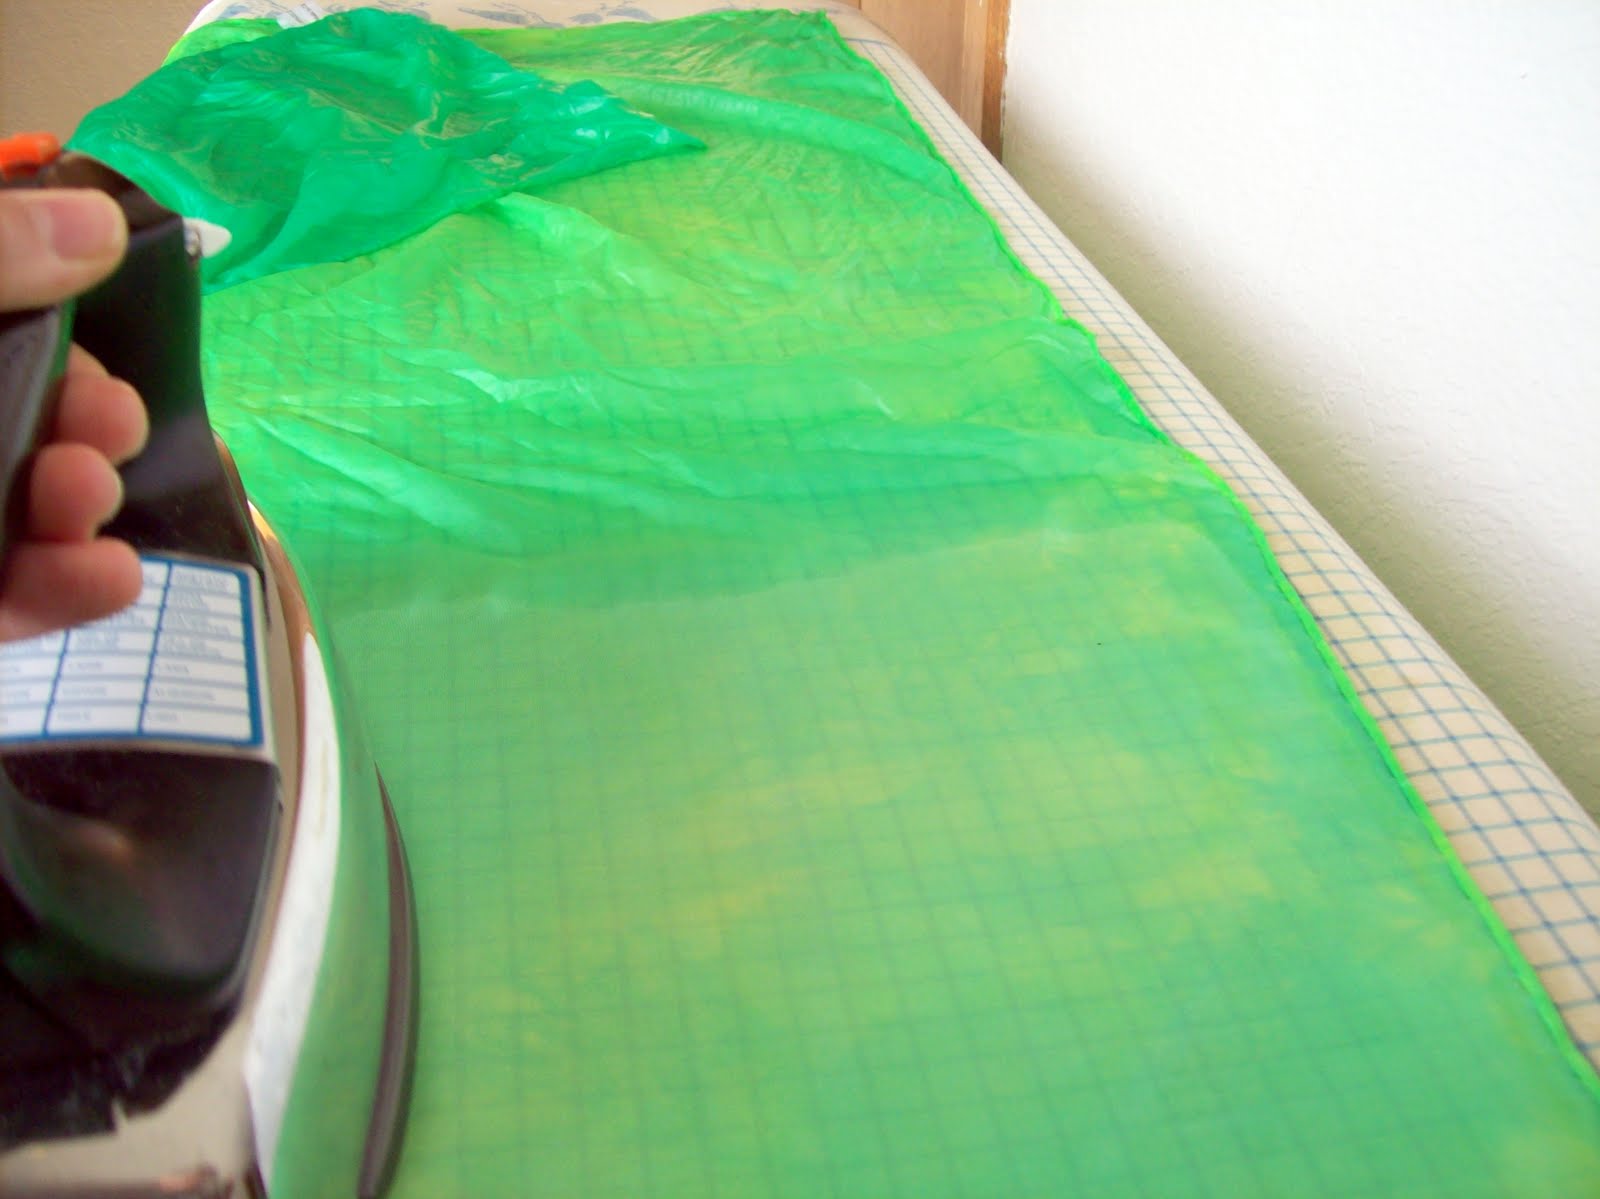
I know, I didn’t cover my ironing board with a towel. I don’t iron clothing, just craft projects, so it’s not really an issue.

That’s it! I like to roll them up to give as gifts, or use as gift wrap for a special present.  We keep ours in a basket, but they look really pretty hanging from pegs if you have wall space.

how-to-dye-playsilks

5 Delicious Keto FatBombs

Sign up to get my 5 Best Keto Fatbomb Recipes sent right to your inbox! Plus a bonus pizza recipe :)

Success! Now check your email to confirm your subscription.

There was an error submitting your subscription. Please try again.

We won't send you spam. Unsubscribe at any time. Powered by ConvertKit
Please follow and like us:
error
fb-share-icon
Tweet
fb-share-icon
← Making Nourishing Traditions Style Chicken Stock Fermented Sweet Tea- Kombucha! →

About Cara

Cara is the main author here at Health Home and Happiness. She loves the health and energy that eating well and playing well provides and has a goal to share what she's learned with as many families interested in making healthy changes as possible.

She helps other families achieve health in simple steps through healing their gut with the GAPS Diet and helps them stock their freezer for busy days with the Allergy-Friendly Afternoon Freezer Cooking Class.

Previous Post: « Soaked Wheat Sourdough Waffles- No Starter Needed
Next Post: Review: No Impact Man »

Reader Interactions

Comments

  1. Cara @ Health Home and Happiness

    April 21, 2010 at 6:01 pm

    Cake dye just has tons of variety :) I haven't tried easter egg dye before, I have done some natural but I kinda like the artificial bright colors.

    Reply
  2. Laila/SignificantlySimple.com

    April 21, 2011 at 12:30 pm

    Those are beautiful! I never in a million years would have thought about dying play silks with Wilton cake colours! Thanks for a great post, my kidlets and I will definitely be trying this in the next couple of weeks! How long did it take for the silks to arrive in the mail?

    ~Laila :o)

    Reply
  3. Kim

    December 6, 2011 at 12:42 pm

    What happens to the color when you wash them? How do you clean the dyed silks?

    Reply
  4. Cheryl

    April 19, 2014 at 8:02 am

    What color Food dye should I use if I want to dye Yellow Chinese Silk Seat Covers a medium Tan or light Brown?
    Brown & Dilute it?

    Also, do you think a Tea Stain would work? By using Tea Bags that have been Steeped?

    Thanks!

    Reply

Trackbacks

  1. 25 Clutter Fee Holiday Gift Ideas- Sustainable, Green, and Sure to be Appreciated! | Health, Home, & Happiness says:
    November 5, 2010 at 9:59 pm

    […] the creative baby, toddler, or preschooler, these are sure to be the favorite gift.  You can also make play silks easily at home, a fun project for an older sibling to do for a younger one […]

    Reply
  2. When my son Owe… | propernounguest says:
    December 5, 2011 at 12:55 am

    […] toys if you are crafty. I bought the play silks as blanks for around five dollars each and then dyed them myself. I bought a push cart at Ikea for just under twenty dollars. This multipurpose toy, which can be […]

    Reply
  3. Creating a Play Space for Preschoolers (Guest Post) | Proper Noun Blog says:
    December 7, 2011 at 8:52 am

    […] toys if you are crafty. I bought the play silks as blanks for around five dollars each and then dyed them myself. I bought a push cart at Ikea for just under twenty dollars. This multipurpose toy, which can be […]

    Reply
  4. Make a Wool Felt Birthday Crown | Health, Home, & Happiness (tm) says:
    April 18, 2013 at 12:21 pm

    […] is silk that we dyed with cake dye to be a pretty yellow.  It’s slippery to sew, but since it’s bunched with the elastic […]

    Reply
  5. 20 Simple Homemade Gift Ideas | Nourishing Minimalism says:
    September 11, 2014 at 3:16 pm

    […] is the ultimate gift for kids and to have it calming. Oh yes, let’s play with playdoh! Homemade Play Silks from Health, Home and Happiness Play silks are great fun and great for the imagination. My kids […]

    Reply
  6. Winter Solstice | Waldorf Life says:
    December 21, 2014 at 12:34 pm

    […] of being a craft hoarder) and redyed an old, faded silk. I used Wiltons cake dye using this tutorial. The colors are vibrant and exactly what I envisioned, love it when that […]

    Reply
  7. 101 Summer Activities for Families That are Good Clean Fun | Health, Home, & Happiness says:
    June 6, 2016 at 12:16 pm

    […] Dye play silks. […]

    Reply
  8. 75+ Activities and Crafts for Teens & Tweens That Won't Get Eye Rolls, Sighs, or Grunts says:
    July 29, 2018 at 10:55 am

    […] Homemade Silks Dyed, Health, Home & Happiness […]

    Reply

Leave a Reply Cancel reply

Your email address will not be published. Required fields are marked *

Recipe Rating


Return to top of page

© 2021 healthhomeandhappiness.com · Affiliates · Log in

We are using cookies to give you the best experience on our website.

You can find out more about which cookies we are using or switch them off in settings.

Health, Home, & Happiness
Powered by  GDPR Cookie Compliance
Privacy Overview

This website uses cookies so that we can provide you with the best user experience possible. Cookie information is stored in your browser and performs functions such as recognising you when you return to our website and helping our team to understand which sections of the website you find most interesting and useful.

Strictly Necessary Cookies

Strictly Necessary Cookie should be enabled at all times so that we can save your preferences for cookie settings.

If you disable this cookie, we will not be able to save your preferences. This means that every time you visit this website you will need to enable or disable cookies again.