

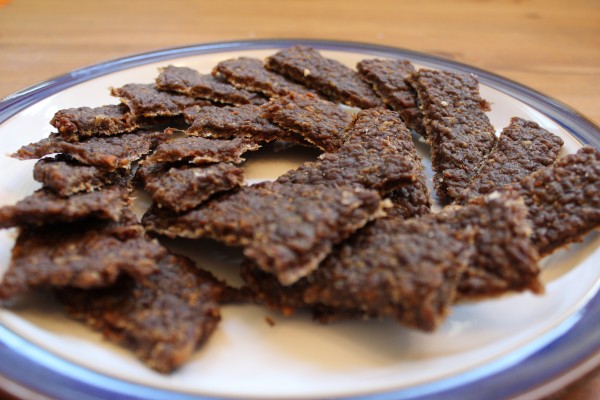
Beef jerky is an easy portable way to get needed protein in either as a quick snack, or even a meal replacement in a pinch. I love to bring this camping and when we do errands or otherwise are out and about. Less chewy than beef jerky from a roast, this ground beef jerky recipe becomes crunchy if you roll it out thinly. When rolled out a little thicker, this beef jerky more substantial and less crunchy.
Note: Sometimes ground beef is called ‘hamburger’ – this is what we called it. In that case, this is also a recipe for hamburger beef jerky :)
Either way, this is a delicious protein-rich treat, and you save lots by making it on your own. Health-wise you can choose beef from a source you trust and only add seasonings that agree with you. Also money-wise because purchasing jerky is expensive. You’ll love avoiding the additive-filled expensive supermarket jerky this year!
Ground beef jerky is suitable for the carnivore, keto, and GAPS diets, as well as a great addition to many others!
Grassfed ground beef for jerky
If you’re looking for grassfed beef, check out Butcher Box and US Wellness. I love and use both companies!
This recipe is also part of my Dehydrator Recipes roundup. If you need more ideas for what to do with your dehydrator, this is the place to go!
Equipment needed:
Dehydrator, optional paraflex sheets, optional jerky gun
Easy Homemade Jerky From Ground Beef
Beef jerky is an easy portable way to get needed protein in either as a quick snack, or even a meal replacement in a pinch. I love to bring this camping and when we do errands or otherwise are out and about. Less chewy than beef jerky from a roast, this beef jerky from ground beef is crunchy if you roll it out thinly. Try it this week, and see how fast this recipe is and how much you enjoy the ease of having easy protein!
Ingredients
- 2 pounds ground beef
- 2 tablespoons sea salt
- 1 teaspoon ground black pepper
- 1 teaspoon other spices as desired (I like garlic powder and smoked paprika, 1 teaspoon each)
- Equipment needed: Dehydrator optional paraflex sheets, optional jerky gun
Instructions
-
In a bowl, mix seasonings into the beef until evenly distributed, with your hands. Divide beef mixture into 3 or 4 sections. Roll to the size of your dehydrator trays between either paraflex sheets or plastic wrap if you don't have paraflex sheets.
-
Remove plastic wrap as you flip the meat onto the dehydrator trays. Score into jerky-sized strips with a sharp knife, being careful not to cut the dehydrator tray, and dry on high overnight, or until thoroughly cooked. Break apart at the score lines.
-
Store in the fridge long term, though the salt and dehydrator preserve this well to last for a weekend camping trip or all day on a hike.
Recipe Notes
Tip: Use scissors, like the ones that came with your knife set, to easily cut this jerky once dehydrated.
Tip 2: You can also use a jerky gun to make thin even strips of jerky without having to roll it out. This is a great job for older kids (it's a little hard for toddlers) and I think it's fun too!
This month's ebook!

Sign up to get the 20 Cool Treats sent to your email right away!
Does that cook the beef or should I pre-cook it?
It cooks the beef if it’s done on high :)
Can you do this in an oven?
I haven’t tried – if you do we’d love to know how it works out if you want to share back in the comments :)
any word on doing this in an oven?
What temperature setting should I use on my dehydrator? Thanks. I really want to try this!
I have an excalibur and I dry it on the highest (hottest) setting.
Do you cook it in the dehydrator on para flex sheets/plastic wrap?
No, I flip it onto the clear plastic grid dehydrator sheets.
You said dehydrator is optional. I assume this means I could use the oven on a low setting. What temperature is your dehydrator set to, so I could try to replicate?
I said that the paraflex sheets and jerky gun are optional :) I haven’t tried this in the oven I’m imagining dry hard thin hamburgers :/ I think it needs the air circulation of a dehydrator but I’m not sure.
So you can do it in the oven @200 with the oven cracked and a fan blowing through. Cook u til instant read thermo says well done or 170 or dry but not crazy brittle.
So you can do it in the oven @200 with the oven cracked and a fan blowing through. Cook u til instant read thermo says well done or 170 or dry but not crazy brittle. Without the fan I do not recommend trying this oven method.
if you roll it out between two sheets of baking paper and leave it in the fridge overnight you can then cut it into strips (using scissors) while still on the baking paper as the time in the fridge dries the raw mixture out a bit and makes it easy to handle. Peel the baking paper off as you add the already cut strips to the dehydrator. I believe you can leave them on the paper too but don’t like to do that as the less contact with the nasties in my baking paper the better. (Same with plastic wrap by the way.) Some brands of baking paper are supposedly safe but heaps more expensive. When dry you don’t have anything else to do but collect it up and store it. It can be frozen or kept in glass jar in fridge. Supposed to last at room temp too but if there is any fat in it that will go rancid so I keep mine in fridge for the week (or two) and freezer for longer than that.
My dehydrator does not have a temp setting of any kind. Just on and off. Is it ok to use this kind of dehydrator? Maybe will need to dry longer and be ok?
Hi! I’m looking forward to trying this recipe. I have two questions – what happens with the fat? I’m sort of wondering if it’s enough fat for my kids or if most of it ends up in the tray. Also, I just got your meal plan list and just finished reading the GAPS book and was looking at getting your intro help. However, you have a lot of meals on the full menu that include fruit and meat. Dr. Natasha seems pretty clear on not eating fruit with meat. Does it change for the full diet or have you just never noticed any problems? Implementing even the full diet seems a bit difficult… We’ve already eliminated grains and most starches, but getting the meal naming has been difficult, even with your meal plan since eating so much meat is very daunting and expensive! Adding fruit to a meal helps, but she seems rather against it. Insight into why you chose to? Thanks!