

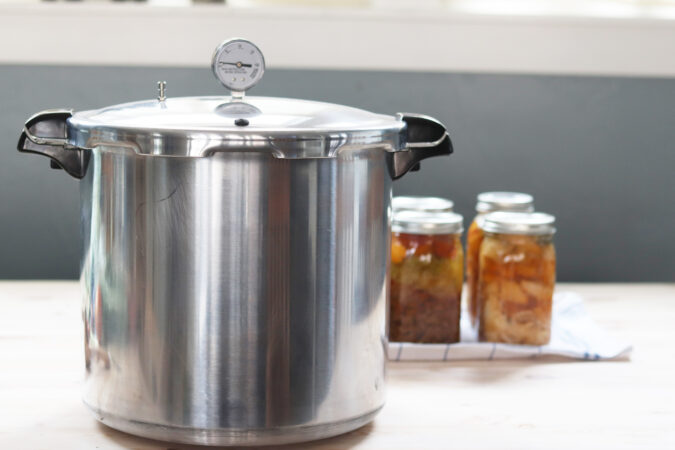
Did you score a deal on ground pork? Looking for a way to speed up nutrient-dense breakfasts? Or are you just fascinated with the idea of shelf-stable ready-to-eat homemade meals? Canned ground pork is a fantastic staple to have on hand. With the help of a pressure canner, you can have your pantry lined with perfectly seasoned ready-to-eat canned pork in no time.

Deals on Pork
Pork from the grocery store can be bland and blah, but if you find heritage pork that has been sustainably raised, you’re in for a treat! I buy mine in bulk locally and from ButcherBox when they have a deal on 10 pounds of ground pork, and then I can it for easy meals and to save freezer space.
Read more: How to Get the Most Meat in Your Butcher Box Subscription
Isn’t Pressure Canning Terrifying?
Temperatures above boiling, glass jars, and whizzing steam, gauges, releases, and botulism- isn’t pressure canning best left to those who are kitchen pros?
Not at all! Pressure canning now is much easier than you may be picturing. Modern pressure cookers have multiple safety features and are much easier to use than you probably are expecting. Recipes have been tested over and over in home kitchens with normal margin of error, and shown to be safe over and over.
Read more and learn how to can meat and soup: Meat and Soup Canning Basics

What do you do with canned ground pork?
I made these pint jars specifically to make for a quick and easy sausage addition for scrambled eggs- you can season with breakfast sausage seasoning prior to canning if you wish, or add desired seasonings as you make breakfast.
To use, I dump the jar into a pre-heated skillet, and then crisp up for a couple minutes prior to adding 6-8 eggs. The fat in the pork is so delicious to cook eggs in! The whole thing is ready in just minutes- faster than cereal!
It’s great for bringing camping or when you’re cooking away from home as well!
Read more: The Down and Dirty Guide to Family Tent Camping
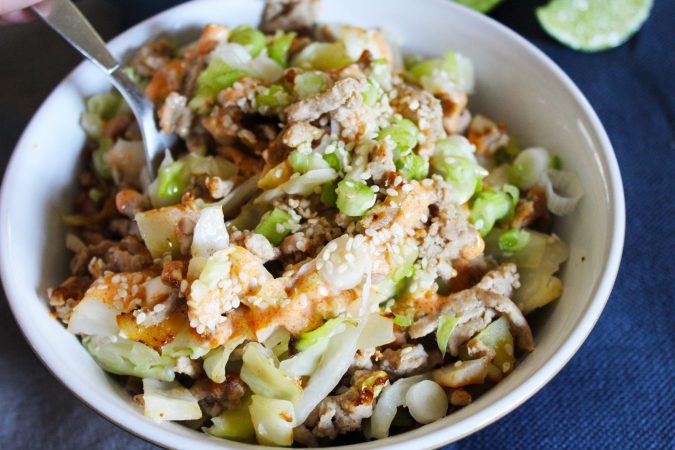
Canned ground pork is also the perfect start to Egg Roll in a Bowl (recipe here).
With taco seasoning (recipe here) added, pre-cooked ground pork quickly becomes taco meat for tacos or taco salad.
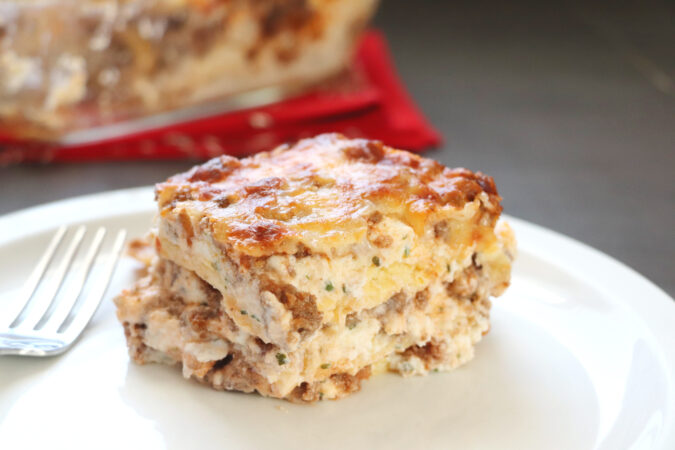
Keto lasagna can be made with ground pork in place of ground beef (recipe here) and is soooo delicious!
Ground pork is also great for soups!
- Low Carb Pumpkin Soup with Pork Sausage (Keto, GAPS, Dairy Optional)
- Low Carb Taco Soup (Keto, GAPS)
How much ground pork is in each jar?
When getting ready to can and use ground pork, as a general rule, 1 pint jar will hold 1 pound of browned pork. One quart jar will hold 2 pounds. For my family of 5 I typically use a pint if I’m adding other protein, and a quart jar if that is the main protein for the meal.

Home Pressure Canned Ground Pork
Ingredients
- 2 pounds Ground Pork or more, adjust the amount of jars you use to accomidate. 1 pound = 1 pint jar.
- 2 teaspoons sea salt optional
Instructions
-
Pre-heat jars and lids to hot but not boiling.
-
Brown desired amount of pork over medium-high heat until bowned but rare on the inside. Pork will continue cooking in the canner. Add desired seasonings now, I usually only add 1 teaspoon sea salt per pound. Drain off fat if desired, I leave mine in.
-
Pre-heat pressure canner over medium heat with 3-4 quarts water, or the amount indicated by your pressure canner’s manual.
-
Add hot cooked pork to each jar, using a canning funnel, leaving 1 inch at the top. Add a little hot water if there are not enough juices from the pork- do not fill above the 1 inch. This is called headspace.
-
Use a clean towel dipped in vinegar to wipe the rim of each filled jar. Top with lids and screw on bands until firmly secured but not over tightened. As tight as you can get them without really forcing anything is just fine.
-
Place hot jars in hot canner and secure lid on canner. Turn heat to high.
-
Once steam is coming out of the vent pipe, allow to vent with steam coming out for 10 minutes.
-
Cover the vent pipe with the counter weight (dial gauges) or weighted gague (jiggler)
-
Once proper pressure is reached, process for indicated time below.
-
After the time has been reached at the proper pressure, remove from heat by either lifting off the electric burner or turning off the gas.
-
Allow canner to de-pressurize on its own, do not open the vent pipe. This takes about 30-45 minutes.
-
Once depressurized, remove jars carefully and allow to cool 1 inch apart on a cooling rack or folded towel. Once cool check lids for seal. If they are sealed, your broth is now good for 1 year at room temperature! Remove rings before storing.
Pressure & Time
-
Pressure: Under 1,000 feet 10 lbs Over 1,000 feet 15 lbs
-
Time: Pint jars 75 minutes, quart jars 90 minutes. *If mixing pint and quart jars, process all for the longer time
More canning recipes