

What seems like a risky endeavor, preparing cultured vegetables with just sea salt, has a few things to keep in mind to ensure that you are growing the ‘good’ bacteria and not the bad. Counter top fermentation is so simple that it is often over thought and second guessed.
Once you understand the process it will be easy to be confident in your ferments, and you’ll quickly be a fermenting king or queen. :)
Really, the process is very simple and difficult to mess up if you follow these steps. We will look into each step in detail below.
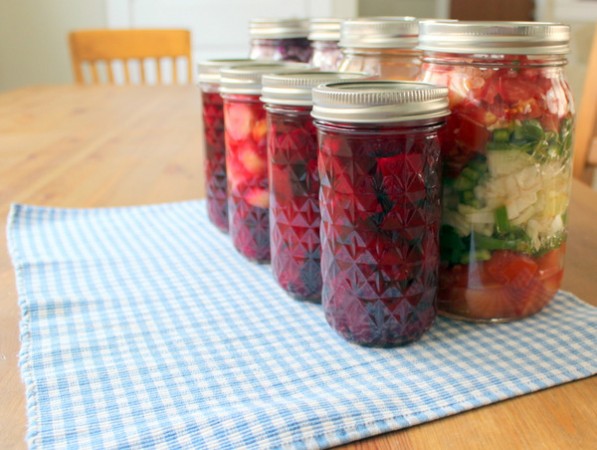
- Choose high quality produce, and discard any blemished bits. Wash with cold water gently, until dirt is removed.
- In the case of leafy or shredded vegetables, toss with about 1 tablespoon sea salt per quart and pack into ‘kitchen clean’ jars.
- Culture in an anaerobic environment. This can mean culturing under a layer of salt water (brine), in a fermentation crock with a weight to hold the vegetables under the brine, or in a jar with an air-tight lid.
- The initial fermentation can go on for months, transfer to the fridge to greatly slow/stop the fermentation process.
- Upon opening, smell and look at your ferments.
- Now you can start using your ferments. I tend to move mine to the fridge after 5-7 days just to get them off the counter and because we want to start eating them.
- Try to only be ‘in and out’ of your ferments once they’re opened a minimal number of times before using them up – every time we open the jar we re-introduce yeasts, molds, and bacteria from the air.
Remember: Fermenting has been around for thousands of years in traditional cultures. Why do things get passed along for that long? Because they work!
See how quick and easy this is in a modern kitchen:
Choose and Wash High-Quality Produce
I try to buy all organic when I prepare cultured vegetables, and seasonal local produce is preferred. The higher quality the soil, the higher the vitamin and mineral content in the vegetables. By fermenting, we are making all those vitamins and minerals more accessible, so we want to have lots to access.
Rinsing the produce in cold water is plenty to wash. Discard anything that is slimy, discolored, starting to mold, or bruised.
Links mentioned in above video:
Freezer Cooking Class
Continuous Brew Kombucha and GAPS
Sea Salt and Ferments (is whey necessary?)
When we prepare cultured vegetables, the most important part is the salt.
The salt holds the pathogenic bacteria at bay until the beneficial bacteria can catch up.
Lactic acid bacteria tolerate high salt concentrations. The salt tolerance gives them an advantage over other less tolerant species and allows the lactic acid fermenters to begin metabolism, which produces acid, which further inhibits the growth of non-desirable organisms. Leuconostoc is noted for its high salt tolerance and for this reason, initiates the majority of lactic acid fermentations. (source)
Commonly, it is thought that the ‘lacto’ in lacto ferments is from dairy, or milk sugar (lactose). In fact, ferments can be done with just salt, no whey necessary. The ‘lacto’ in lactofermentation is from lactobacillis, the beneficial bacteria group responsible for the sour taste in pickles and other cultures.
This lactic acid produced by lactobacillis bacteria is what prevents most of the pathogenic (bad) microorganisims from being able to survive in the cultured vegetable. (source)
Whey is called for in some recipes because it is rich in beneficial microorganisims, which help the starter to have lots of ‘good bugs’ to start off with. This can also be done with pickle juice from pickles which are naturaly fermented, or juice from a prior batch of ferments.
Read: How to make whey from yogurt
Because there is both good and bad bacteria present in the air, and we take steps to help the good bacteria thrive and the bad bacteria to die, we can prepare fermented vegetables just fine without a starter culture (whey or pickle juice).
Culture Vegetables in an Anaerobic Environment
By using an air-tight container, or a fermentation weight that holds the vegetable to be fermented under a brine solution, we limit the amount of oxygen that is available to what can be used up soon in the fermentation process. By not allowing the fermenting vegetable access to oxygen, molds and yeasts that are undesirable are starved out. (source)
Changes That Occur as the Vegetables Ferment
Because vegetables are mostly water, the salt brine is able to penetrate into the water of the plant, causing availability of vitamins and minerals to go up, and digestion to be easier.
This study shows that folate (so necessary, and so different than folic acid – see here) is increased 8x in rye through fermentation.
Micro-organisms contain certain enzymes, such as cellulases, which are incapable of being synthesised by humans. Microbial cellulases hydrolyse cellulose into sugars which are then readily digestible by humans. Similarly pectinases soften the texture of foods and liberates sugars for digestion. Fermented foods are often more easily digestible than unfermented foods (Kovac, 1997), (Parades-Lopez, 1992). (source)
Examine Your Fermented Vegetables Upon Opening
They should not smell like ‘rotten garbage’ but have more of a tangy-sour-salty smell. Look at your ferments, is the top covered in mold? Something went wrong then when you prepared your cultured vegetables. Discard.
You will usually see this warning when people talk about home fermentation, but I very rarely have to throw out a batch. Usually the only time, in fact, is when I am trying to take videos or pictures for the blog, so the process is paused (especially if I have to wait for the camera to charge, or I get distracted or have to pick up the kids from school and the ferment-in-progress gets left out for hours before being put in the jar). Don’t be intimidated by this at all, at least 95% of my ferments have turned out perfectly, and I am not a perfectionist in the fermenting department by any means.
Storing Your Fermented Vegetables to Prevent Mold
Once your vegetables are cultured, you can transfer them to a cool basement, or a fridge. The coolness slows the fermentation process.
Once you open your jar, every time you open it you’re introducing yeasts, bacteria, and molds from the air. So try to get everything you need with a clean spoon or fork, and then close the jar back up. Try to use the ferments within a couple weeks once they are opened – the salt and beneficial bacteria in the ferments will prevent it from going bad too quickly, but it’s best to use it up sooner rather than later. Ferments that are unopened, in the fridge or another cool place can last for months.
Kitchen Tip for Preparing Cultured Vegetables
Because shredded vegetables seem to work their way out of the work area and onto the counter and floor, it’s easiest to just prepare a bunch of cultured vegetables at once. I love using my food processor with a slicing blade (this is the one I have currently) and the whole process goes quickly!
You can read more about bulk-culturing a bunch of ferments here:
How to Quickly Fill Your Fridge with Cultured Vegetables

Learn how to heal leaky gut

60-page ebook of all my best GAPS Diet (Gut and Psychology Syndrome) articles all in one place.
I have a dumb question, so please forgive me.
Would it be possible to lightly cook the vegetables before putting them in the jars to ferment?
I have been on GAPS/Paleo for about a year, after food sensitivities got bad and forced me to figure out what was wrong. I worked with a good holistic nutritionist, and learned a lot.
My diet has changed 180 and I’m doing better. I do tolerate fermented diary — I like yogurt and eat it often. But I don’t like fermented veggies very much, and as a consequence I don’t eat them very often.
But I think it would be helpful if I could eat more of them. I think I would like them better if they were not raw — if they were slightly cooked. I love cooked veggies as a rule.
So that’s the reason for my dumb question. What if I cut up a lot of nice raw veggies as you show in your video, put them on a baking sheet and roasted them in the oven for 20 mins, and then put them back in the bowl to cool, added salt, and packed it all in jars? What would happen? Would the veggies still ferment?
Thanks very much.
No
U kill all the enzymes in the food and the bacteria on the food when u bake it. Some of the bacteria is good, the ones u need to ferment. Without them the food will just rot.
These bacteria are why u don’t need a starter culture to ferment, they’re on the skin of all the produce. The culture helps, yes. But not required.
This is such a great and interesting article! I really enjoy fermentation; it’s a tasty and healthy way to preserve your food and add a little kick to recipes. And the very best part is that it’s super easy to do yourself! Check out our recipes and how to videos at http://www.spoiledtoperfection.com/
My biggest concern about an anaerobic environment is botulism. Can you please explain to me how, ferments keep this out? Yhank you.
I think the acidity of the ferment make it so botulism can’t grow- but I haven’t tested the ph in my ferments so I don’t know for sure. You can see this article for more info on botulism and ph http://www.fda.gov/food/foodscienceresearch/safepracticesforfoodprocesses/ucm094192.htm
I am excited about learning to ferment. The health benefits sound like fermenting will be a blessing for me and my family. I want to know if the power goes out for either a shirt or long time, will my food that has already been transferred to the refrigerator be safe to eat or will it spoil?
I eat them after a power outage. Good question, Karen :)